How to install Apache Tomcat on Ubuntu
Tomcat, also known as Apache Tomcat, is a Java-based web application server that is free, open-source, and lightweight. Programmers use it to implement the Java Servlet and Java Server Pages technologies (including Java Expression Language and Java WebSocket). Tomcat allows developers to create a variety of enterprise Java applications. That’s why this guide is created to help you install Apache Tomcat on Ubuntu. Please see How to upgrade Apache Tomcat from One Version to another,how to Install Apache HTTP Server on Ubuntu 20.04 LTS, and How to rebind Tomcat Keystore with a new Certificate.
In addition to running Java code, Tomcat also runs an HTTP web server environment. The most recent stable version of Tomcat is series 9.0.56, which is the first Apache Tomcat release to implement Servlet 4.0 requirements at the time of writing this guide. Tomcat is maintained by a large group of developers. The Coyote engine, which is included with Tomcat, is a web server that allows developers to connect a variety of Java enterprise applications and capabilities. Version 9.0.56 has the following properties:
- Provide protection against a known OS bug that causes the acceptor to report an incoming connection more than once.
- Implement a workaround for a JVM bug that can trigger a file descriptor leak when using multi-part upload and the application does not explicitly close an input stream for an uploaded file that was cached on disk.
- Fix exceptions when the security manager is enabled, and the first request received after starting is an HTTP request to a TLS-enabled NIO2 connector.
Tomcat converts JSP files (server-generated webpages comparable to PHP and ASP files) to Java code, which the server then compiles into. Class files and runs on the Java virtual machine. As of now, Tomcat is unquestionably one of the most useful servlet containers on the market.
See more here: tomcat. Read on to learn more about the server and how to install Apache Tomcat on Ubuntu. Please see How to install Java Runtime Environment on Mac OS.
Uses of Apache Tomcat
Apache Tomcat is one of the most extensively used Java servers, it has a wide range of applications. For example, KonaKart, a Java-based shopping cart application, runs on Tomcat and makes use of it as a Java API and SOAP Web Service interface.
Tomcat has been altered and moulded by several developers because of its open-source nature; distributors include Spring source’s Enterprise Ready Server (ERS)
Tomcat is also utilized in cloud environments, such as Axon datacenters, where Tomcat is deployed in part. The Apache Tomcat project is meant to be a collaboration of the best-of-breed developers from around the world, according to the Apache Tomcat team.
Across a wide range of sectors and organizations, Apache Tomcat software drives countless large-scale, mission-critical online applications.
Benefit of using Apache Tomcat
1: In Ubuntu, Tomcat provides a simple and speedy way to run your applications. It allows for faster loading and makes a server work more efficiently.
2: Tomcat comes with a number of built-in customization options that allow users to operate in a variety of ways.
3: Tomcat is an open-source application that is free to use. It allows for extensive customization thanks to code access.
4: Tomcat provides an extra layer of protection to its consumers. Because of its stability, even if Tomcat has problems, the rest of the server continues to function.
With this step-by-step guide, I will teach you how to install Tomcat on any version of Ubuntu, because the code works on about any. The steps were evaluated on all versions of Ubuntu, but the screenshot demo was on version 18.04. However, for other versions the steps are the same.
Other guide can be gotten from here: How to install MariaDB on Ubuntu/ and How to Install LAMP Stack on Ubuntu 18.04/ also How to Configure Advanced PAM in Linux/ and How to locate directory file context and restore it with SELinux
Installing Apache Tomcat on Ubuntu
Step 1: Apt update
To run the Java web application code, we need to install Java before we can install Tomcat on Ubuntu. In Ubuntu, we need a java runtime environment to proceed with this. Java is easy to set up and use. Simply follow the instructions below:
sudo apt updateInstall the Java platform
sudo apt install default-jre
To verify that the operation succeeded, let’s run the command
java -version
Step 2: Check for Tomcat in Repository
The repository will show you all the latest packages available for download.
sudo apt-cache search tomcat
Step 3: Download Apache Tomcat
Download the tomcat9 package and the tomcat9 admin package and its dependencies with the following terminal command.
sudo apt install tomcat9 tomcat9-admin
Step 4: Install Apache Tomcat Server on Ubuntu
ss -ltn
8080 open port number, the default open port reserved for Apache Tomcat Server.
Step 5: Enable or Disable tomcat
sudo systemctl enable tomcat9
or
sudo systemctl disable tomcat9Step 6: Allow Traffic to Port 8080
To allow traffic from any source to port 8080 of the Tomcat Server, type in the following command.
sudo ufw allow from any to any port 8080 proto tcp
Step 7: Test Installed Apache Tomcat Server
You can connect to the Tomcat server using the system’s dynamic ip address by entering the port and the address in the URL search box as follows:
first do ip addr show to get your ip address
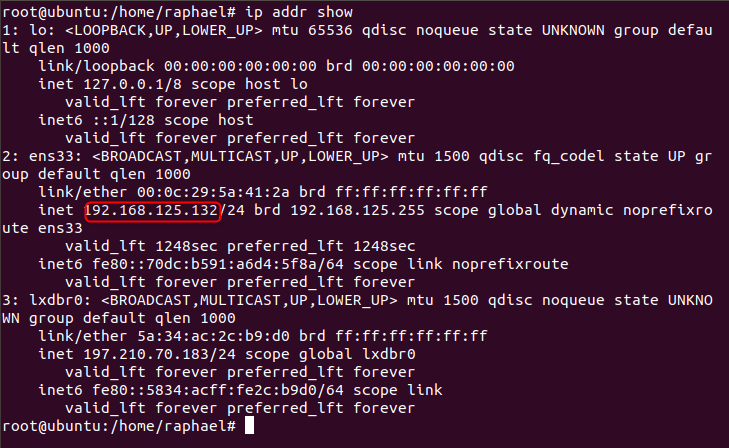
http://192.168.125.132:8080
Step 8: Create User
To use the Apache Tomcat Web Application Manager, you’ll need to create a new user account.
Open the tomcat-users.xml file in the Tomcat directory with your favorite text editor.
sudo nano /etc/tomcat9/tomcat-users.xmlAdd these three tagged lines to the file above the “<>” tag when it is opened. Here, a new user with the name “techdirectarchive” and the password “raphael” has been made. Substitute your own values for the username and password. We just added the line below to the file without making any modification to what was existing
<role rolename="admin-gui"/>
<role rolename="manager-gui"/>
<user username="techdirectarchive" password="raphael"roles="admin-gui,manager-gui"/>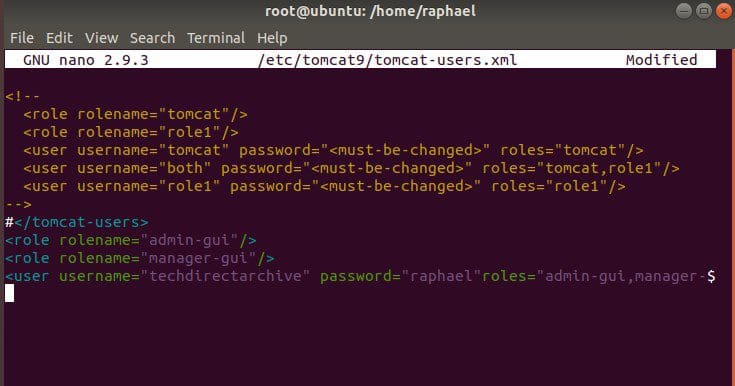
Step 10: Restart Apache Tomcat on Ubuntu
systemcl restart tomcat-9
Summary
The Apache Tomcat Server is a fantastic piece of software for setting up a Java HTTP server. It’s quite simple to set up Apache Tomcat Server on Ubuntu, and it doesn’t require any complicated procedures. Just follow the steps above and you will be able to install Apache Tomcat on any version of ubuntu.


