As a Ubuntu Linux system administrator, there might be a time when we have several tasks to handle at the same time. Of course, being able to work within the stipulated time to enhance productivity is one of the things we always strive to achieve. In this article, we shall create Multiple Users with Passwords in Ubuntu Linux. Please see How to reset MySQL Root password, Windows 10 Administrative Shortcut command key, and Active Directory Administrative Tools shortcut.
When it comes to Linux, there are different levels of users with each having its own level of permission and we create these users for different purposes. You can read the following related topics that also talk about Linux:
- How to Create Symbolic Links in Linux
- How to Install Terraform on Linux
- How to install MariaDB on Ubuntu
- How to Configure Advanced PAM in Linux
- Locate, Find, and Grep: How to search for files and patterns in Linux/Unix-like OS
Sometimes we are tasked with creating more than one or multiple users at the same time. We can’t start creating the users one by one when tasked set before us is to be accomplished within a limited time.
Hence, this short guide is aimed at showing you how to create multiple users at the same time and set a password for each one of them on an Ubuntu Linux system.
Before we move on let’s discuss the types of users we have available in Linux. Please see How to block the Change Password Feature for All Users via the Exchange Administrative Center, and Change your root password: How to enable and disable the root user on your macOS.
Type of Users in Ubuntu Linux
Linux being a multi-user OS that is based on the Unix concepts of file ownership and permissions to provide security at the file system level has two types of users that’s; root users (system users), regular users, and service users.
Administrative Root Users
Primarily, Linux administrative root account is automatically created when you install Linux, and it has administrative privileges for all services on Linux OS. The root account is also known as superuser. The root user or superuser also has the ability to override any file ownership and permission restrictions.
In real-time scenarios, this means that the superuser has the right to access anything on its own server. This user is used to make system-wide changes and must be kept secure. It is also possible to configure other user accounts with the ability to assume “superuser rights”.
In fact, creating a normal Ubuntu Linux user that has sudo privileges for system administration tasks is considered the best practice.
Regular Users
Regular users have the necessary privileges to perform standard tasks on a Linux OS such as running word processors, databases, and Web browsers.
They can store files in their own home directories. Since regular users do not normally have administrative privileges, they cannot accidentally delete critical operating system configuration files. Hence, the need to apply caution before using the sudo (superuser do) command.
Service Users
Services such as Apache, Docker, Kubernetes, Squid, mail, games, and printing have their own individual service accounts. These Ubuntu Linux accounts exist to allow each of these services to interact with your computer.
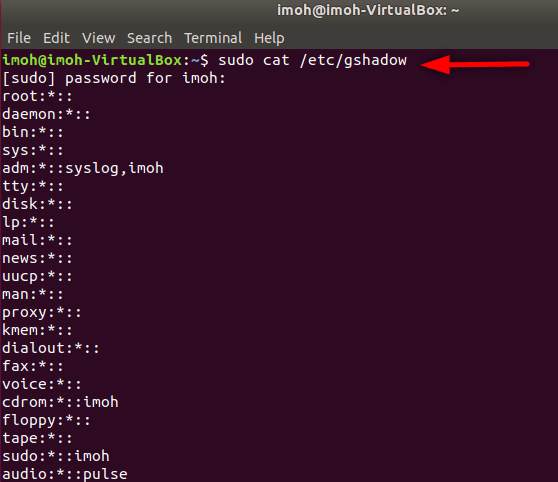
The list of users can be found in the /etc/passwd or awk -F':' '{print $1}' /etc/passwd while /etc/gshadow is used to store users’ passwords.

To understand it better, there are two standard users in Linux that is; system users and regular users. From the above, the administrative user or super user or root user, and service users are under system users created by default immediately the Liinux OS is set up while the regular users are created by the system administrator
Having introduced briefly the types of users available in Ubuntu Linux, let’s go over to the main task of the day which is creating multiple users at the same time and setting passwords for each of them.
Create Multiple Ubuntu Linux Users
To create multiple users at the same time we will use the following step.
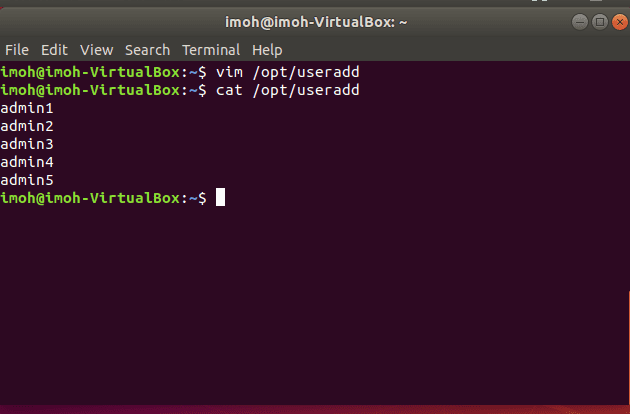
Step 1: Create a directory and list down the names of users you which to create in it by running touch /opt/useradd. In the screenshot below, we created the/opt/useradd, used vim /opt/useradd to edit and add the names of the Ubuntu Linux users we want to add as admin1, admin2, admin3, admin4 and admin5 respectively. Of course, the /opt/ directory is a reserved directory so it’s read-only.
While writing down the list of users in Vim editor you can’t write to it using the normal :wq! command but :w !sudo tee % command as shown in the screenshot below.


To be sure the names have been written and saved, let’s view the /opt/useradd directory by typing cat /opt/useradd
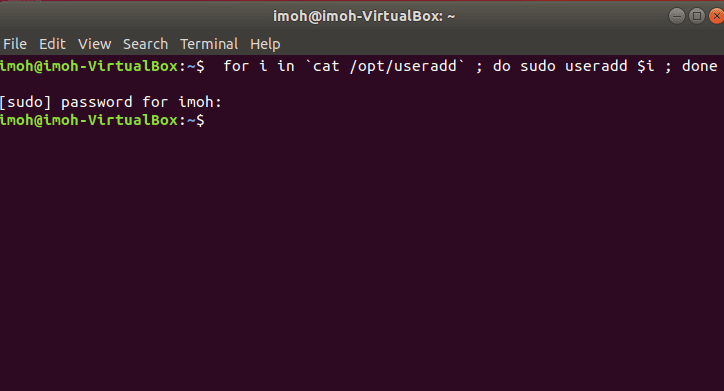
Step 2: As the next step, let’s run ‘for loop’ as shown below to create the users
Step 3: Run the command below to view the list of newly added users and respective IDs. Not each user in Linux is mapped to a unique ID when created.
for i in `cat /opt/useradd` ; do sudo useradd $1 ; done 
Note this awk -F':' '{print $1}' /etc/passwd of cat /etc/passwd command can also be used to view the list of user accounts Set Passwords for Multiple Ubuntu Linux User Accounts
We are done with creating multiple users at the same time. From the above we have created 5 users at the same time, now it’s time to secure their accounts by setting passwords for each of the accounts.
To set different passwords to each user, interactively run the below command
for i in `cat /opt/useradd` ; do sudo passwd $i ; done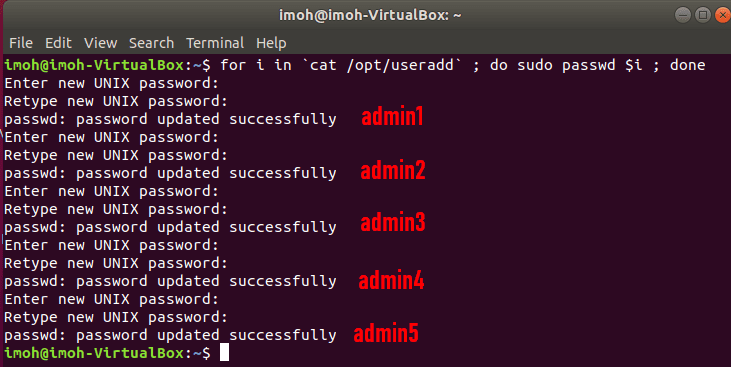
We have successfully updated passwords for all the users we created. You can go ahead and switch users using the su username command. For example, let’s switch users to one of the users we just created.
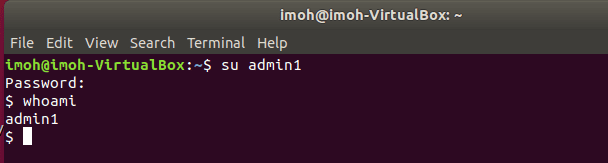
Let’s sayadmin1 that’s su admin1 and use the whoami command to confirm that it’s admin1 account.
That’s all. In this post we have learned about different types of users in Linux, creating multiple user accounts and setting passwords for each of them at the same time.
I hope you found this blog post helpful on how to create Multiple Users with Passwords in Ubuntu Linux. Please let me know in the comment section if you have any questions.