Skip to content

TechDirectArchive

Hands-on IT, Cloud, Security, Veeam & DevOps

  • Home
  • About
  • Advertise With US
  • Reviews
  • Contact
  • Toggle search form
  1. Home
  2. Breadcrumb-Yoast

[wpseo_breadcrumb]

How to enable or disable color filters in Windows

Posted on 26/06/202211/12/2023 Matthew By Matthew No Comments on How to enable or disable color filters in Windows
  1. Home
  2. Windows
  3. How to enable or disable color filters in Windows
Featured-image_1

In Windows 10 and 11, color filters were added as part of the ease of access feature to help user see and distinguish between colors on their screen. In this article, we shall discuss how to enable or disable color filters in Windows. These color filters operate at the system level and contain numerous color filters that can change your screen to black and white, invert colors, and so on. These filters are intended to help persons who are colourblind discern between colours on their screen. Please see how to Block downloads on Microsoft Edge using GPO on Windows Server 2019 and 2022, and Set Google Chrome as default: How to set a browser as default in Windows.

Furthermore, persons with light or color sensitivity can simply employ these filters to make the text simpler to read, expanding Windows’ reach to much more users. In this color filter guide, we will show you how to enable or disable color filters in Windows.

There are different types of color filters available in Windows 10 and 11. Such as Greyscale, Invert, Greyscale Inverted, Deuteranopia, Protanopia, and Tritanopia.

Here are other related guides: Internet Explorer: How to disable IE via Group Policy or Windows Registry Settings, and how to forcefully remove Microsoft Edge Browser the hard way from your device.

How to Enable or Disable Color Filters in Windows 11

See below the two methods to enable or disable color filter in Windows.

Method 1: Through Setting and using the Keyboard Shortcut

The color filters feature can access through the Windows settings. You can change from the default grayscale color to any other color available in the color filters, which becomes the new default color.

You may also use the keyboard shortcut Windows Key + Ctrl + C to switch on and off the color filters function, but you must first enable the Keyboard shortcut under the color filters settings.

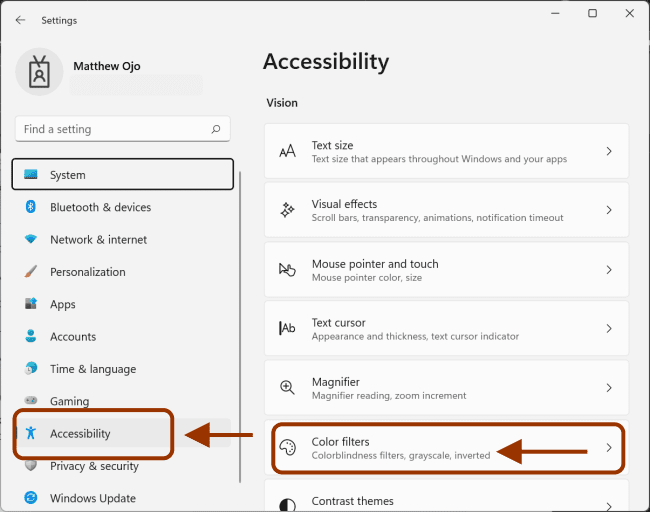
Follow these steps to activate the keyboard shortcut Windows Key + Ctrl + C: Press Windows Key + I to open Settings then click on Accessibility. From the right-hand menu, click on Color filter.

Accessibility

Click the toggle to turn-on the Keyboard shortcut for color filter. Now you can use the shortcut Windows Key + Ctrl + C keys to enable Color filter any time you want.

Visual impairment

Under the Color filters, select any color you want from the list. You can then use the shortcut key combination to turn on and off the color filters.

Display settings

The default filter will change to the selected filter which you can now turn on and off using the keyboard shortcut.

Note: The keyboard shortcut Windows Key + Ctrl + C keys only enable/disable the color filter that has been set in the settings. If you want to change the color filter to another color, go to the settings and change the color.

Method 2: Enable or Disable Color Filter Using Registry Editor

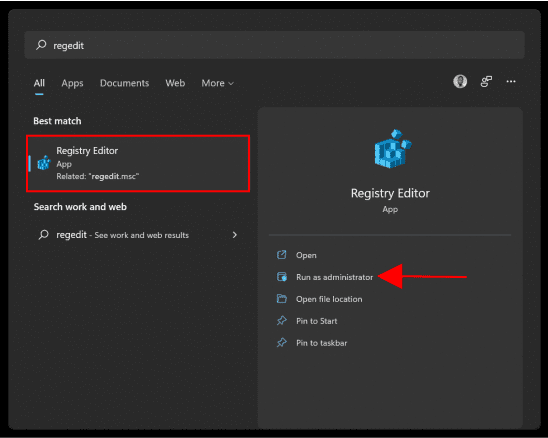
First, search for “Registry Editor” in the Start menu and run as administrator.

Color adjustments

Navigate to the registry folder path below:

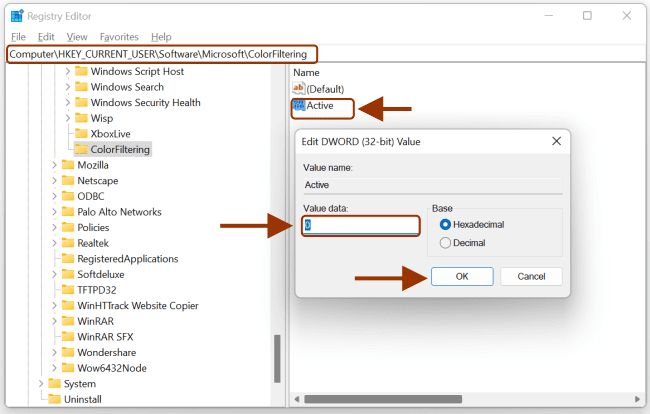
Computer\HKEY_CURRENT_USER\Software\Microsoft

Then Right-click on the “Microsoft” folder and select “New >> Key.”

image6-1

Name the Key “ColorFiltering”. Then right-click on the ColorFiltering key then selects New > DWORD (32-bit) Value.

image7-1

Name this newly created DWORD as Active then double-click on it to change its value according to one of the following options:

  • 1: Enable Windows Color Filters
  • 0: Disable Windows Color Filters
image8

Again right-click on the ColorFiltering key then select New > DWORD (32-bit) Value.

image7-1

Name this DWORD as FilterType then double-click on it to change its value data to one of the following options:

image9-1

The value data 0, 1, 2, 3, 4 and 5 represent the following:

  • 0 = Greyscale
  • 1 = Invert
  • 2 = Greyscale Inverted
  • 3 = Deuteranopia
  • 4 = Protanopia
  • 5 = Tritanopia

Click OK then close the registry and restart your PC to save changes for your Windows Color Filters.

I hope you found this article useful on enable or disable color filters in Windows. Please feel free to leave a comment below.

Rate this post

Thank you for reading this post. Kindly share it with others.

  • Share on X (Opens in new window) X
  • Share on Reddit (Opens in new window) Reddit
  • Share on LinkedIn (Opens in new window) LinkedIn
  • Share on Facebook (Opens in new window) Facebook
  • Share on Pinterest (Opens in new window) Pinterest
  • Share on Tumblr (Opens in new window) Tumblr
  • Share on Telegram (Opens in new window) Telegram
  • Share on WhatsApp (Opens in new window) WhatsApp
  • Share on Mastodon (Opens in new window) Mastodon
  • Share on Bluesky (Opens in new window) Bluesky
  • Share on Threads (Opens in new window) Threads
  • Share on Nextdoor (Opens in new window) Nextdoor
Windows Tags:Microsoft Windows, Windows 10, Windows 11, Windows Server 2016

Post navigation

Previous Post: How to delete Windows old folder in Windows 11
Next Post: Focus on Tasks: Limit Distraction & Get Things Done on Windows

Related Posts

  • Capture 2
    MDT Invalid credentials: The network was not found Windows
  • Featured post.
    How to fix The Group Policy settings for BitLocker startup options are in conflict and cannot be applied Security | Vulnerability Scans and Assessment
  • ShieldServersSmall
    How to track your device performance and health via Windows Security in Windows 10 Windows
  • TrueCrypt to BitLocker
    How to Migrate from TrueCrypt to BitLocker Backup
  • screenshot 2020 02 07 at 20.59.01
    How to use the utility “Whoami” in windows Windows
  • Capture 37
    How to Configure Network Load Balancing on Windows Server Backup

More Related Articles

Capture 2 MDT Invalid credentials: The network was not found Windows
Featured post. How to fix The Group Policy settings for BitLocker startup options are in conflict and cannot be applied Security | Vulnerability Scans and Assessment
ShieldServersSmall How to track your device performance and health via Windows Security in Windows 10 Windows
TrueCrypt to BitLocker How to Migrate from TrueCrypt to BitLocker Backup
screenshot 2020 02 07 at 20.59.01 How to use the utility “Whoami” in windows Windows
Capture 37 How to Configure Network Load Balancing on Windows Server Backup

Leave a Reply Cancel reply

You must be logged in to post a comment.

Microsoft MVP

VEEAMLEGEND

vexpert-badge-stars-5

Virtual Background

GoogleNews

Categories

veeaam100

Veeam Vanguard

  • Get certificate thumbprint
    Retrieve an SSL Thumbprint in Windows using PowerShell Scripts
  • Microsoft 365 Developer Program instant
    Get your free Microsoft 365 E5 Sandbox today AWS/Azure/OpenShift
  • Screenshot 4
    Veeam Agent for AIX: Initial Deploy/UUID Error Network | Monitoring
  • VRAM on Windows 1
    Check the Size of Video Random Access Memory (VRAM) in Windows Windows
  • MacOS Catalina Desktop
    Mac FileVault Encryption: How to enable FileVault disk encryption Security | Vulnerability Scans and Assessment
  • Implement Azure Bicep
    How to Deploy Azure Resources Using Azure Bicep Automation
  • MBAM
    Fix MBAM Client Deployment is only supported on MBAM 2.5 SP1 Windows
  • Azure Stack 1
    How to create a load balancer for Azure Stack Hub Network | Monitoring

Subscribe to Blog via Email

Enter your email address to subscribe to this blog and receive notifications of new posts by email.

Join 1,803 other subscribers
  • RSS - Posts
  • RSS - Comments
  • About
  • Authors
  • Write for us
  • Advertise with us
  • General Terms and Conditions
  • Privacy policy
  • Feedly
  • Telegram
  • Youtube
  • Facebook
  • Instagram
  • LinkedIn
  • Tumblr
  • Pinterest
  • Twitter
  • mastodon

Tags

AWS Azure Bitlocker Microsoft Windows PowerShell WDS Windows 10 Windows 11 Windows Deployment Services Windows Server 2016

Copyright © 2025 TechDirectArchive

Loading Comments...

You must be logged in to post a comment.