Fix “Getting Windows Ready” Don’t turn off your computer stuck on Windows
When Windows 10 or 11 gets stuck on the “Getting Windows Ready—Don’t turn off your computer” screen for an extended period of time, it may be quite frustrating. In this troubleshooting guide, you will learn how to Fix “Getting Windows Ready” don’t turn off your computer stuck on Windows. Here are some related guides: How to create a Windows 10 or 11 bootable USB with UEFI support, and to enable or disable Windows Defender Credential Guard, and how to fix MDT deployment failed and Stuck at Command Prompt: Windows installation does not proceed via PXE boot.
During the installation of critical updates, the “Getting Windows ready” message will display. After around 4 to 5 minutes, the message will go away, the computer will restart, and you will be able to resume working as usual. But sometimes the message stays for a long time, and users have no idea how long it will be until Windows is ready.
Steps to Fix Laptop Stuck on Getting Windows Ready
Follow the steps discussed in this article to fix the endless “Getting Windows Ready” problem on Windows 10 and Windows 11. For more on Windows, read: How to create a dual-boot setup on Windows 11, how to Create a Restore Point on Windows 10 and Windows 11, and how to perform a Fresh Start installation of Windows 10.
Method 1: Wait for an Extended Period of Time
Don’t give up hope if the “Getting Windows Ready” message remains on the screen for an extended period. For me, the wait time for an older machine to exit the “Getting Windows Ready” page can vary from 30 minutes to 2 hours or even more. Leave your computer alone for a longer time if there are several updates to install.
In addition, if your system uses a hard disk drive (HDD), I would recommend switching it to a solid-state drive (SSD) to improve the overall performance of the system.
Please see How to fix TeamPass stuck on working on it, How to get the Windows 10 Version 22H2 Update, Enable TPM: Determine if TPM is present, and Fix Hyper-V VM Stuck in Stopping State.
Method 2: Hard Shut Down
If you’ve waited too long or are in a rush to get back to work and the message on the screen still remains, you can force the computer to shut down by pressing the power button. Here’s how to do that:
- Press and hold down the power button for at least 10 seconds to completely turn off your computer.
- Disconnect all USB peripherals e.g., USB flash drives, USB printers, etc. (except of course the mouse and keyboard).
- Disconnect the power cord from the computer and also disconnect the battery if it is a laptop and if it is removable.
- After 5 minutes connect the power cable. (Reattach the battery first if you own a laptop).
- Turn on your computer and check if it starts normally without getting stuck in the “Getting Windows Ready” message.
Method 3. Repair Startup Problems
If none of the previous solutions worked, the next step is to try to address the problem using the options in the Windows Recovery Environment (WinRE).
Step 1: Force Windows to Boot in Windows Recovery Environment (WinRE)
Press and hold down the power button for at least 10 seconds to completely turn off your PC.
- Turn On your PC, and when the manufacturer’s logo appears (or when you see the spinning dots), hold down the power button for 10 seconds to turn off your computer again.
- Repeat the above process 2 more times and then leave your PC to boot.
When the “Automatic Repair” screen appears, click Advanced Options, and continue to the next step.

Important: If your PC does not start in WinRE, make a Windows 10 or 11 USB installation media from another functioning PC and then boot the affected computer from the installation media. Then, on the first screen, select Next, followed by Repair your computer > Troubleshoot.
Step 2: Run Startup Repair
From the Windows Recovery Environment (WinRE), select Troubleshoot.

Click on Advanced options.

Click the Startup Repair option and then select the target OS (e.g., Windows 10).
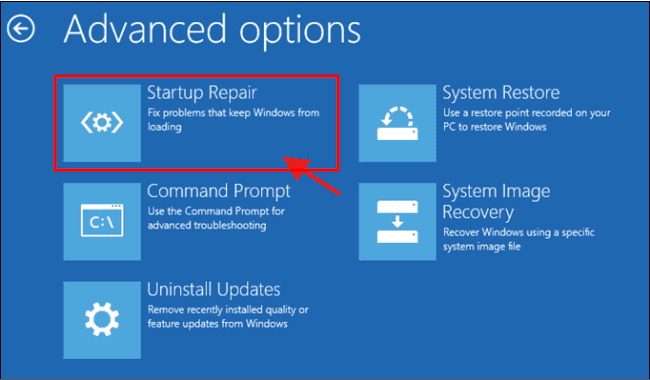
Let Windows repair the startup components and then restart. Boot to Windows normally and proceed to install updates again.
Method 4: Uninstall Recent Update
If you’ve run into this problem, you should remove the most recent update from WinRE because it usually happens when an update installation fails.
To boot into the Windows Recovery Environment (WinRE), see above method 3 (step 1). In Advanced options choose Uninstall Updates.

Choose an account with administrative privileges, type in the password, and click Continue.

First choose Uninstall latest Quality update and follow the on-screen instructions to uninstall it.

If the problem still happens after you remove the latest quality update, try removing the latest feature update and see if that helps.
Method 5: Perform System Restore to fix “Getting Windows Ready” don’t turn off your computer stuck on Windows
If you’ve already tried restarting your computer and reinstalling Windows but Windows still gets stuck on the “Getting Windows Ready” screen, you may try using WinRE to restore your computer to a functioning condition. See our detailed guide on how to create a restore point.
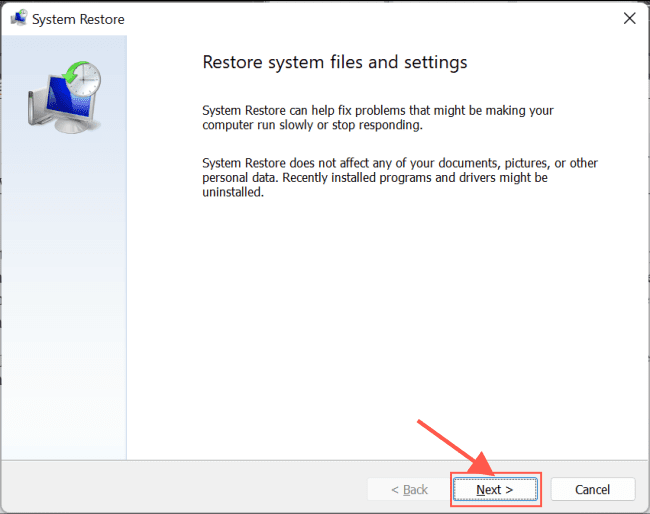
To boot into the Windows Recovery Environment (WinRE), see above method 3 (step 1). On WinRE Advanced options –> System Restore.

If prompted, select an account with administrative privileges, type a password for that account and click Continue.
At the System Restore screen, click Next. If you receive the message that “no restore points have been created on your computer…” skip to next method.
Select Show more restore points and select a date that you know your computer was working correctly, and then click Next.

Click Finish and Yes again to start to restore process.

Now, wait until the restore process is completed. During the restore process, your computer will restart several times and when it’s done, you should enter in Windows without problems.
Method 6: Perform Windows Reset to fix “Getting Windows Ready”
If you can’t get your computer to start up, you can try reinstalling the operating system by choosing “Reset this PC” in WinRE. When you choose “Reset this PC,” your apps and settings are deleted, but all of your data stays the same. If the above solutions are unsuccessful, try this one.
To boot into the Windows Recovery Environment (WinRE), see above method 3 (step 1).
Click Reset this PC in the Troubleshoot screen. Keep in mind that the Reset this PC option is not available if you started from a USB Windows installation Media. At this case, skip to next method.

At the next screen choose to Keep my files. Remember that all applications and settings will be removed if you continue, and you will need to reinstall your programs when the process is complete.

If prompted, select an account with administrative privileges, type a password for that account and click Continue.
If you PC is connected to Internet, select Cloud download, otherwise choose Local reinstall.

Finally, use the Reset this PC tool to reinstall Windows, and this will eliminate the error “Getting Windows Ready Don’t turn off your computer stuck on Windows”.
Conclusion on how to fix “Getting Windows Ready”
If none of the above solutions works, your only option is to back up your data and do a clean installation of Windows.
I hope you find the post helpful on How to Fix “Getting Windows Ready” Don’t turn off your computer stuck on Windows. If you have any questions, please leave a comment below.


