Migrate Microsoft Enterprise Root Certification Authority and Forest Domain to Azure

Hello everyone, welcome to the second chapter on Migrating Active Directory Certificate Service (Certification Authority) technology. This article discusses the step-by-step to Microsoft Enterprise Root Certification Authority and Forest Domain Domain to Azure (Migrate Root CA and AD Domain to Azure). Please, see “Understanding User Roles & Access Control in Object First OOTBI“, and how to create a backup job for Proxmox VMs using VBR.
The migration of Active Directory (AD) and Certification Authority (CA) to Azure consists of three key phases: Hybrid Planning, Hybrid Execution, and On-Premises Retirement. See Unveiling OOTBI Mini and New Features for v1.7 from Object First.
1. Hybrid Planning
Secure network connectivity (Point-to-Site VPN) is established between the local environment and an Azure VNet. A hybrid strategy is decided upon, extending the existing AD to Azure via Azure AD Connect and virtual machines (VMs) that will become Domain Controllers (DCs) in Azure (IaaS solution).
Please, see how to migrate Windows Servers from Hyper V to Proxmox Correctly, and Hyper V Disk allocation: Why Veeam reports full size after Shrinking.
2. Hybrid execution
Active Directory: Create a new DC as a VM in Azure and promote it within the existing domain. Proceed with verifying the AD replica and migrating the FSMO roles.
Certification Authority: Create a new CA server in Azure.
Certification Authority (CA) (On prem): Back up the on-premises CA (private keys and database) and restore it to a new server/DC in Azure. Update the CRL (Certificate Revocation List) distribution points to reflect the new paths in Azure.
Please, see Restore VM to Original location using Veeam Entire VM restore, Video Remoting was disconnected on Hyper V, and how to Fix Authentication failed: Invalid credential after installing VSA
3. On-Premises Retirement
Verify full functionality of Azure-certified authentication and services. Finally, demote the Domain Controllers and uninstall the CA role from the local environment, completing the migration and optimising cloud services.
New Domain Controller VM on Azure
First step create new Domain Controller VM on Azure

Check the functionality of Windows Server 2022 Datacenter: Azure Edition hotpatch.
I left RDP enabled from the public because in my case I need to reach the Domain Controller server through my on-premises infrastructure, and it will be protected with an NSG rule that only trusts the company’s IP address, as per security best practices.

Disk

Creating an additional disk for system state backup.

proceed to the next window.

Create new Azure Vnet & Subnet dedicate Domain Controller And CA

Configure the Orchestration patch without rebooting

TAG Configure tags according to company policy

Configuration of the new VM Domain Controller completed. Next step: Set up new VM dedicated to CA

Check the functionality of Windows Server 2022 Datacenter: Azure Edition hotpatch.
I left RDP enabled from the public because in my case I need to reach the CA server through my on-premises infrastructure, and it will be protected with an NSG rule that only trusts the company’s IP address, as per security best practices.

Disk

Assigning VNet\Subnet

Provisioning a Certification Authority (CA) on a Virtual Machine
When provisioning the Virtual Machine (VM) that will host the Certification Authority (CA), it is essential ( in my case) to assign a public IP address (PIP).
This allocation is necessary to ensure that the certificate issuance and revocation service is publicly accessible and usable via this network interface.
Please, see OOTBI Security Best Practices: Enable Honeypot on Object First, and Unknown Error occurred when installing Veeam Software Appliance.
Network Security Group (NSG) configuration
In a subsequent phase, the Network Security Group (NSG) associated with the VM will be configured.
The NSG will be implemented with highly restrictive access rules (Inbound Security Rules) that will allow connectivity to the service only from the source public IP address ranges specifically authorised to interact with the CA. This ensures strict network segmentation and minimises the attack surface.

Default setting for Management\Monitoring\Advanced. TAG Configure tags according to company policy

Finalise the creation of the VM CA

RDP Configuration and Security
The exposure of the RDP service to the Internet environment was implemented through a Network Security Group (NSG).
This NSG was configured to allow Remote Desktop Protocol (RDP) access to the Virtual Machine (VM), limiting the source of traffic to the company’s public IP address (PIP) only.

Key Points
- Exposed Service: Remote Desktop Protocol (RDP).
- Target: Virtual Machine (VM).
- Security Mechanism: Network Security Group (NSG).
- Access Rule (Inbound): Allowlisting of the company’s public IP (PIP) for RDP access.
- Purpose: Remote access and monitoring of the VM.
This configuration ensures that RDP access is only allowed from a trusted and predefined source, reducing the attack surface compared to indiscriminate RDP openness.
Please, see How to Install and configure Active Directory Certificate Services, and how to Import certificates into Trusted Root and Personal certificate store.
Configure Point-to-Site VPN VPN (P2S)
It is possible to create two types of VPN on Azure STS & PTS. In my case, a Point-to-Site IPSec VPN was created. Please, see this guide for more information.
Purpose: to promote the domain controller on Azure and replicate the Active Directory Forest/Domain.
- Step 1: Create a Virtual Network
- Step 2: Configuring the VPN Gateway
- Step 3: Creating the Root Certificate
- Step 4: Configuring the Point-to-Site connection
- Step 5: Connect to the VPN
Step 1: Create a Virtual Network
I used the Vnet I had previously created for the new production infrastructure on Azure, and created the corresponding Gateway subnet.

Add subnet

Subnet added successfully

Please, see Import certificates into Trusted Root and Personal certificate store, how to Install ROOT CA Enterprise and NPS Wifi Certificate, and “Change your root password: Manage the root user on your macOS“.
Step 2: Configuring the VPN Gateway
Create Virtual Network Gateway

Enter the basic details

Keep populating as you wish

Virtual Network Gateway created

Deployment VNG complete

Check Vnet1GW proprieties Virtual Network Gateway

Please, see How to Resize or Expand Proxmox Hard Drive, and Offline and Online Update for Object First Out-of-the-Box Cluster.
Step 3: Creating the Root Certificate
The next step is generating a root and client certificates for your P2S connection. I connected to my Onprem Domain Controller via RDP to create the preliminary certificate for the Point to Site VPN. Here is the Powershell command for generate root & client certificate
# Our root certificate
$cert = New-SelfSignedCertificate -Type Custom -KeySpec Signature -Subject "CN=AchrafRootCertificate002" -KeyExportPolicy Exportable -HashAlgorithm sha256 -KeyLength 2048 -CertStoreLocation "Cert:\CurrentUser\My" -KeyUsageProperty Sign -KeyUsage CertSign
# Our client certificate
New-SelfSignedCertificate -Type Custom -DnsName ClientAchrafCertificate -KeySpec Signature -Subject "CN=ClientAchrafRootCertificate002" -KeyExportPolicy Exportable -HashAlgorithm sha256 -KeyLength 2048 -CertStoreLocation "Cert:\CurrentUser\My" -Signer $cert -TextExtension @("2.5.29.37={text}1.3.6.1.5.5.7.3.2")

Export certificate

Choose the “No, do not export the private key”.

Select the below option “Base-64 …)

Enter export location

Export complete

Please, see “Configure VPN on Windows Server: How to allow remote VPN Access for Domain or Local Users, and Add Synology NFS Storage to Proxmox VE for VMs and Backups“.
Step 4: Configuring the Point-to-Site connection
Populate the with the details as you wish based on your environment.

After completing the Point-to-Site VPN configuration, download the VPN client to install on the Domain Controller.

Step 5: Connect to the VPN
Download and Installing the VPN client on the Domain Controller and connect to VPN

VPN Added

Connect to Azure VPN

Now that we have established the VPN from the OnPrem Domain Controller to Azure, we can proceed to run DCpromo on the Azure VM.
Please, see How to setup Veeam Software Appliance v13, and Troubleshooting WinRM and Kerberos Delegation for WAC.
DC promo on VM Azure
Run DCpromo on the VM in Azure

Check that replication has completed successfully with the command
#Open cmmd Administrator
repadmin /replsum
Check FSMO roles.
netdom query fsmo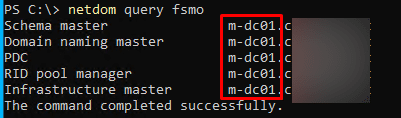
Transferring Multiple FSMO Roles at Once
Please, see Move-ADDirectoryServerOperationMasterRole. It is possible to transfer several operation master roles at once:
Move-ADDirectoryServerOperationMasterRole -Identity dc2 –OperationMasterRole DomainNamingMaster,PDCEmulator,RIDMaster,SchemaMaster,InfrastructureMasterTIPS: After moving the FSMO roles, verify that the change has been implemented. As a best practice, the Forest and Domain FSMO roles should be divided between two different Domain Controllers.
Alternative method
FSMO Role Names and Numeric Values

Move-ADDirectoryServerOperationMasterRole -Identity dc2 –OperationMasterRole 0,1,2,3,4Please, see Setup Windows Admin Center Modern Gateway for Single Sign-On, What is taking up by Synology NAS Volume Space, and download and update Synology DiskStation NAS to DSM 7.3.
Enterprise Certification Authority Migration
Notes: To move a CA from a server that is running Windows 2000 Server to a server that is running Windows Server 2003, you must first upgrade the CA server that is running Windows 2000 Server to Windows Server 2003. Then you can follow the steps that are outlined in this article. Please, see how to move a certification authority to another server.
Notes: The new server must have the same computer name as the old server.
Backup CA use the Certification Authority snap-in to back up the CA database and private key.
To do this, open On-Prem CA

Backup your old Ent Root CA

Select items to backup

Protect your CA DB and private key

Export certificate from Registry

Choose the location and apply

After backup the CA, first step is remove and uninstall role & feature from Old CA

First uninstall
NDES “Network Device Enrollment”

Let us proceed with the removal of the all remaining CA roles


Install CA Roles
Now let’s proceed to the new CA server (it is recommended that the new CA server have the same FQDN as the old CA).

Select Role service and configure


Choose the Enterprise CA

Here, select Root CA

Specify the type of the private key

Import existing certificate


Check imported certificate private key

Confirm path logs certificate Database

Click on Configure

AD CS Configuration NDES and CES
In my case, I need to use and configure the NDES and CES roles. Let’s proceed.

Populate the RA Certificate

Configure cryptography for NDES

Configure CA Certifcate Enrollment We Service (CES)

Select the type Authentication

Specify the service account

Please, see Add additional CC400W Cameras to Synology Surveillance Station, and Update Veeam Backup for Proxmox Plugin to support PVE 9.0.
Server Certificate
Specify a Server Auth Certificate

Recap wizard confirmation

Result window as shown below.

Restore Certificate Database and Its Configuration
After configuring the new Ent Root CS, proceed with restoring the database.

Select the All tasks and then the restore CA as shown below.

Click on OK

Proceed to select the CA backup previously performed.

Enter the password entered to protect the CA backup

Restore operation

Post restore check your issued certificate

Please, see How to update Proxmox VE 9.0 now Supported by Veeam, and Logon Failure: User has not been granted the requested logon type.
Configure new CRL & CDP
Create dir: C:\Dati

Add the CA computer object to the share permission

Add computer CA on full permissions

Create CRLD
Go to IIS of the your CA and create a new Virtual Directory for CRL

Enter the Alias and Path and click on OK

Configure “Directory Browsing” on Virtual Directory CRLD

Configure “Directory Browsing” on Virtual Directory CRLD

Section drop-down list, choose system.webServer/security/requestFiltering.
In the allowDoubleEscaping drop-down list, choose True

Configuration editor

Copy crl files from C:\Windows\System32\certsrv\CertEnroll to C:\Dati

Copied as shown below

Go to CA console dx and click “Proprieties”

Add new CRL Location

Compose a new string for the CRL location and press ‘Insert’

Restart CA service

Check pkiview for new CRL Location

Verify the CRL File Exists and is Accessible via IIS

Please, see Server Certificate could not be updated: Private key does not match, Fix Error 0x87E10BC6 on a PC running Windows non-core Edition, and What to know about “Failed to perform Veeam Worker Upgrade”.
Troubleshooting and fix error during IPSEC SCEP certificate enrolment
You don’t have sufficient permission to Enroll whit SCEP

Order of handler mappings is not correct. If the previous methods have not been successful, the order of the handler mappings should be checked.
To do this, navigate to the Default Web Site in the IIS Management Console and click on “View Applications” on the right-hand side

NDES splits into two applications:
- The interface for requesting one-time passwords (mscep_admin).
- The interface for requesting the certificates (mscep).
The following steps must be performed consecutively for both applications

After double-clicking the application, the “Handler Mappings” option is selected.

View Ordered List” is selected on the right side.

The “StaticFile” handler must be placed above the ” ExtensionlessUrlHandler-ISAPI-4.0_64bit”

NDES must then be restarted using the iisreset command.

Open browser am go this link http://localhost/CertSrv/mscep_admin/. Try enrolling a new IPsec certificate again.

The migration is complete. I hope you found this article on “Migrate Microsoft Enterprise Root Certification Authority and Forest Domain Domain to Azure (Migrate Root CA and AD Domain to Azure). very useful. Please, feel free to leave a comment below.


