
Looking to streamline your workflow? Import repo to Bitbucket Cloud, a versatile hosting facility. Store code, and docs, and collaborate seamlessly for software and web projects. Public or private access for devs and engineers. In this article, we shall discuss how to “Import Repo to Bitbucket Cloud: Seamless Migration to GitLab”. Please see Free Remote Desktop Software for Windows in 2023, How to Setup GitLab Runner on WSL, and how to fix Failed to remove network for build: Error during connect in the default daemon configuration on Windows, the Docker client must be run with elevated privileges.
Looking to streamline your development workflow? Import repo to Bitbucket Cloud seamlessly. GitLab Inc. offers powerful DevOps software, combining development, security, and operations in one platform. Bitbucket Server, now called Stash, is a Java-based Git server with a web interface. It empowers you to manage code access and perform Git tasks effectively.
Some similarities between GitLab and GitHub
I would say GitLab and GitHub have the best user interface, and most developers prefer GitHub because it’s more popular. However, teams using Jira benefit from having seamless integrations with the Atlassian ecosystem.
GitLab has Continuous Integration/Continuous Delivery (CI/CD) and DevOps workflows built-in. GitHub enables you to work with the CI/CD tools of your choice, but you’ll need to integrate them by yourself.
Bitbucket’s code hosting is solid, but the web experience is quite lacking. The code search is not supported, nor is the File Finder, and this could be the reason you want to migrate among other things.
Import your project from Bitbucket Server to GitLab
The Bitbucket Server importer does not work with Bitbucket Cloud. The Bitbucket Cloud importer simplifies repository importing, enhancing user experience.
We’ll show you how to seamlessly import a repo to Bitbucket Cloud from a different repository. To ensure successful imports into the Bitbucket Server, administrators need to enable import success.
Kindly follow these steps to have it done. In the Bitbucket Server in the Admin area,
- Click on Settings
- On General,
- Click on Visibility and access controls and
- Finally Import sources.
You can import the following to BitBucket Server while retaining repository public access. If a Bitbucket repository is private, GitLab maintains its privacy.
- Repository description
- Git repository data
- Pull requests
- Pull request comments
Below are the steps to import your projects into GitLab. Sign in to GitLab, and Select New project

Here are some related guides: How to unregister a GitLab Runner, how to install, register, and start GitLab Runner on Windows, how to uninstall GitLab from your Windows device, and Deploying and using Windows containers with Gitlab CI.
This will open the Create new project window. Select the Import project as shown below.

Also, see How to change Windows 11 and 10 default mail app to Outlook, how to enable dark theme in Windows 11, and how to Backup and Restore Your WordPress Files and Database.
Select Bitbucket Server
As you can see, you can import projects from a wide range of repositories

Enter your Bitbucket Server URL and your personal access token in order to access your Bitbucket account as shown in the image below.
Upon entering your personal access codes, and granting GitLab access to your Bitbucket account. You could click on List your BitBucket Server Repositories in order to select one.

Import Repo to Bitbucket Cloud
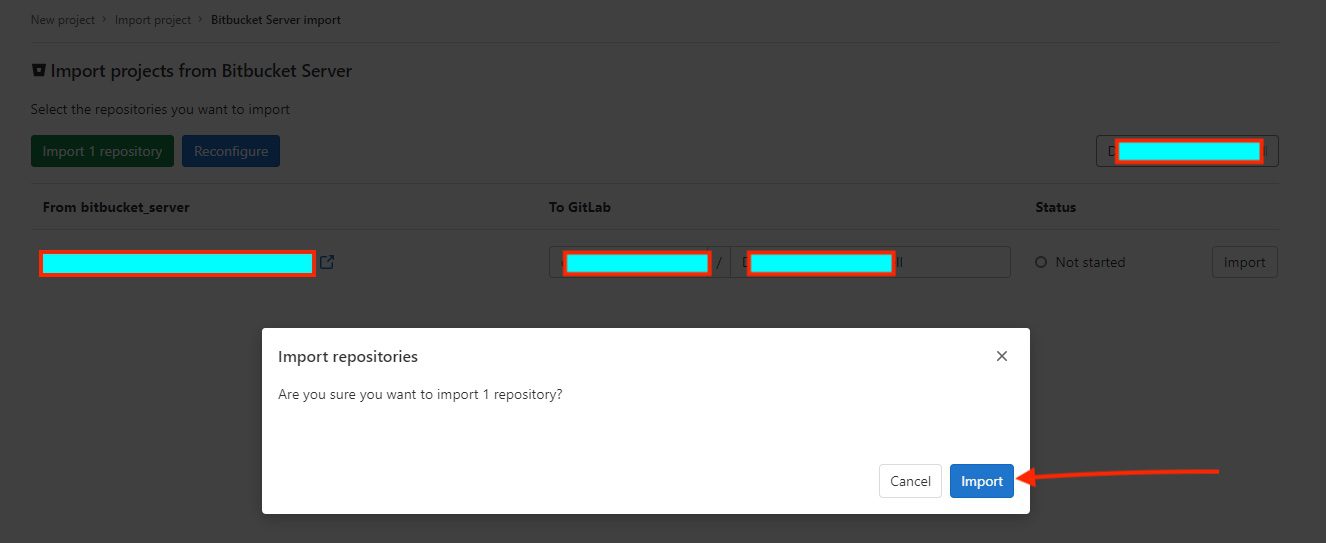
Select the projects to import, or import all projects. You can filter projects by name and select the namespace for which to import each project.

As you can see below, I have selected a project to import from Bitbucket.
As you can see, the project import is pending and currently being imported.

Finally, the image below shows a successful import of our project from Bitbucket Server to GitLab.

Bring your project into the GitLab
This process is different from importing from Bitbucket Cloud. Import your projects from Bitbucket Cloud to GitLab with minimal effort. The Bitbucket importer can import:
- Repository description
- Git repository data
- Issues
- Issue comments
- Pull requests
- Pull request comments
- Milestones
- Wiki
Log on to Bitbucket Cloud to start the project import. When importing, it is worth noting that references to pull requests and issues are preserved.
Also, the repositories with public access will be retained. If a repository is private in Bitbucket, it’s created as private in GitLab as well. To proceed with this import, you will have to sign into GitLab.
On the top bar, select New (), and select New project/repository.
Next, you will have to select Import project.
Select Bitbucket Cloud. As you can see, you can import projects from a wide range of repositories.

Grant GitLab access to your Bitbucket account as shown in the image below. Upon granting access, a list of your BitBucket Cloud Repositories in order to select one.

Select the projects that you would like to import or import all projects. You can filter projects by name and select the namespace each project will be imported.

Troubleshooting: Resolving Project Import Error with Namespace Path
If the following error is prompted, here is how to resolve the issue: “Importing the project failed: Project namespace path can contain only letters, digits.
As you can see, the state will change to pending and then complete.

As you can see, the migration to GitLab has succeeded (complete).

Now, let’s click on the project to access it and to see if it was successfully migrated. As you can see from the image below, it was. Also, under the activities, you will see an entry of the user who imported a project.

Install from a different Repository
Bitbucket provides an importer to grab a repository. This importer works if you have your code in CodePlex, GitHub, Google Code, SourceForge, Subversion, or another Git-based hosting site. However, if your hosting site doesn’t fall into one of these sources or you don’t have a URL to enter, you must convert your code to Git.
To import into Bitbucket Cloud, kindly follow the steps below. Access your Bitbucket account and click on import repository from the Create a new repository page.

Select the Source of the code you want to import. Depending on the Source, the system asks you to provide some more information.
Enter a Name for your new repository, Uncheck This is a private repository If you want the repository to be public, Select the Repository type,
Note: If your organization has configured a personal access token to retrieve the repository via your Git client or the command line, then you may need to use it in lieu of your username/password within the Bitbucket importer.

If you wish to enter a description and allow forking etc, expand Advanced settings and fill out the rest of the page if necessary. When you are done, hit the Import repository button.

I hope you found this blog post helpful. If you have any questions, please let me know in the comment session.


