Skip to content

TechDirectArchive

Hands-on IT, Cloud, Security, Veeam & DevOps

  • Home
  • About
  • Advertise With US
  • Reviews
  • Contact
  • Toggle search form

How to enable dark theme in Windows 11

Posted on 30/08/202329/09/2023 Matthew By Matthew No Comments on How to enable dark theme in Windows 11
  1. Home
  2. Windows
  3. How to enable dark theme in Windows 11
Enable dark theme in Windows 11

Windows 11 introduces a fresh look and a range of new features aimed at enhancing usability and personalization. One such addition that has received a lot of attention is the use of a dark theme. The dark theme is popular owing to the visual change it provides and the practical benefit it provides by reducing eye strain in low-light conditions. Please see Windows Desktop Icon: How to Make Default System Icons Visible. In this guide, you’ll learn how to activate the dark theme in Windows 11 for a unique look and feel, as well as a more immersive computing experience.

If you’d want to use Windows 11 with a dark theme—perhaps to cut down on glare while working late at night—but aren’t sure where to start, this guide will take you step by step through the process.

Kindly read the following related guides Focus on Tasks: Limit Distraction & Get Things Done on Windows, Windows Stickers: Creating Desktop Stickers on Windows 11, Learn more about the Enhanced Multi-Monitor Experience with Windows 11, and how to fix File Explorer thumbnails issue on Windows 11.

Turn on Dark Mode in Windows 11

To activate dark mode in your Windows 11 environment, follow these steps: It’s important to note that dark mode applies primarily to the Windows 11 desktop and specific Microsoft applications.

For other apps like Google Chrome, you’ll need to enable dark mode separately. Press the Windows key to bring up the Start menu and select Settings.

Open system settings

In the Settings, click on “Personalization,” and on the right side, click on “Colors.”

Choose colors
Choose colors

You may also want to check these: How to Install and Setup WordPress into a cPanel and Configure Your First WordPress Theme, how to enable Enhanced Networking Adapter (ENA) on Windows, and Creating Profiles for your AWS Access Credentials for AWS Toolkit in Visual Studio.

Choose your mode

A menu will appear, featuring a drop-down labeled “Choose your mode.” Click on this drop-down and select “Dark.”

Change your theme mode to dark

Once you’ve made your selection, Windows will transition to dark mode.

Dark theme mode enabled

Alternatively, if you prefer to customize dark mode settings for individual apps and Windows components, you can choose “Custom.” Then, click on “Choose your default Windows mode” and “Choose your default app mode” to switch to your preferred mode.

Customize your theme mode

If want, you can further enhance your visual experience by adding an Accent color.

Set the Accent color for your Windows

You can do this by turning on the switches next to “Show accent color on Start and taskbar” and “Show accent color on title bars and windows borders.”

Turn on the accent color modes

If you turn on Accent color, it will be visible in the designated areas of your interface.

Also, see Windows Disk Cleanup: Creating Shortcut & Perform Clean-up, and how to Change BitLocker Password in Windows.

How to Use Contrast Themes to Enable Dark Mode

If you’re seeking an alternative to dark mode that enhances the visibility and readability of the system interface, contrast themes can be an ideal choice. Windows 11 extends a variety of contrast theme options for you to explore:

Note: Contrast themes apply broadly to most applications and Windows components on your system.

Press the “Windows key + I” to open Settings. Select “Personalization,” click on “Colors.”

From here, choose “Contrast themes.”

Click the contrast themes tab

Click the “Contrast themes” dropdown and select the theme that best suit you. You can see them previews at the top of the page.

Select your preferred contrast theme

To effect your chosen theme, select “Apply.”

Once chosen, the contrast theme instantly enhances visual clarity. To further customize, select the “Edit” option for fine-tuning.

Edit your contrast theme to customize it

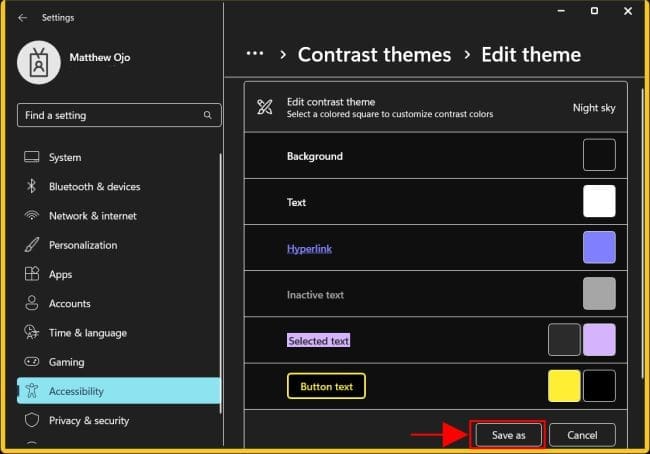
Click “Save as” to apply your changes. You may want to read these: Windows Color Filters: A How-To Guide, and how to upgrade VMware Tools in vSphere.

Conclusion on Dark Theme in Windows

By following these guidelines, you can effortlessly tailor your Windows 11 experience to align with your preferred visual aesthetics and readability requirements.

I hope you found the guide on the Steps to Enable Dark Theme in Windows 11 useful. Please let me know in the comment section if you have any questions.

Rate this post

Thank you for reading this post. Kindly share it with others.

  • Share on X (Opens in new window) X
  • Share on Reddit (Opens in new window) Reddit
  • Share on LinkedIn (Opens in new window) LinkedIn
  • Share on Facebook (Opens in new window) Facebook
  • Share on Pinterest (Opens in new window) Pinterest
  • Share on Tumblr (Opens in new window) Tumblr
  • Share on Telegram (Opens in new window) Telegram
  • Share on WhatsApp (Opens in new window) WhatsApp
  • Share on Mastodon (Opens in new window) Mastodon
  • Share on Bluesky (Opens in new window) Bluesky
  • Share on Threads (Opens in new window) Threads
  • Share on Nextdoor (Opens in new window) Nextdoor
Windows Tags:Microsoft Windows, Windows 11, Windows Server 2016

Post navigation

Previous Post: WinDirStat: Check what files are taking up space on Windows
Next Post: Fix Remote Connection Issue: An Authentication Error Has Occurred with Code 0x80004005

Related Posts

  • Featured image SmartScreen
    Fix SmartScreen can’t be reached right now on Windows 10 and 11 Anti-Virus Solution
  • windows 10 keyboard shortcut 1024x512 1
    How to create a Desktop shortcut in Windows Windows
  • wac
    Fix Windows Admin Center cannot be reached Windows
  • SSD Trim and Disable delete operaion from ending up in Recycle bin
    SSD TRIM: Delete files permanently without using the Recycle Bin Windows
  • Shared Folder
    How to access shared resources from two different domains Windows
  • How to keep Apps up to date on Windows
    How to keep Apps up to date on Windows devices Windows

More Related Articles

Featured image SmartScreen Fix SmartScreen can’t be reached right now on Windows 10 and 11 Anti-Virus Solution
windows 10 keyboard shortcut 1024x512 1 How to create a Desktop shortcut in Windows Windows
wac Fix Windows Admin Center cannot be reached Windows
SSD Trim and Disable delete operaion from ending up in Recycle bin SSD TRIM: Delete files permanently without using the Recycle Bin Windows
Shared Folder How to access shared resources from two different domains Windows
How to keep Apps up to date on Windows How to keep Apps up to date on Windows devices Windows

Leave a Reply Cancel reply

You must be logged in to post a comment.

Microsoft MVP

VEEAMLEGEND

vexpert-badge-stars-5

Virtual Background

GoogleNews

Categories

veeaam100

Veeam Vanguard

  • Shrink and Compact Virtual Hard Disks
    How to Shrink and Compact Virtual Hard Disks in Hyper-V Virtualization
  • VMware and HyperV are not compatible
    How to fix VMware and HyperV are not compatible Virtualization
  • FIX RDP Authentication Error
    Fix Remote Connection Issue: An Authentication Error Has Occurred with Code 0x80004005 Windows
  • Screensaver
    How to Enable or Disable Screen Saver on Windows Windows
  • Add camaeras
    Add additional CC400W Cameras to Synology Surveillance Station Backup
  • install virtualbox on linux mint ubuntu
    How to install Windows Server 2019 on Virtualbox Windows Server
  • allthings.how how to download and install winget windows package manager windows 10 winget cli
    How to install Winget CLI on Windows Windows Server
  • elastic ip association error screen
    Fix Elastic IP Address Could not be Associated AWS/Azure/OpenShift

Subscribe to Blog via Email

Enter your email address to subscribe to this blog and receive notifications of new posts by email.

Join 1,800 other subscribers
  • RSS - Posts
  • RSS - Comments
  • About
  • Authors
  • Write for us
  • Advertise with us
  • General Terms and Conditions
  • Privacy policy
  • Feedly
  • Telegram
  • Youtube
  • Facebook
  • Instagram
  • LinkedIn
  • Tumblr
  • Pinterest
  • Twitter
  • mastodon

Tags

Active Directory Azure Bitlocker Microsoft Windows PowerShell WDS Windows 10 Windows 11 Windows Deployment Services Windows Server 2016

Copyright © 2025 TechDirectArchive

Loading Comments...

You must be logged in to post a comment.