Run Python Script via Windows Task Scheduler

In this article, you will learn how to determine the number of MBAM Recoveries Performed, and how to run Python Script via Windows Task Scheduler. Windows Task Scheduler enables you to perform routine tasks in Windows on individual PCs. Task Scheduler does this by monitoring whatever criteria you choose. This is referred to as “triggers” and then executing the tasks when those criteria are met. You can use the Task Scheduler to execute tasks such as starting an application, Wbadmin Email Alerts: Sending an email message, etc.
Note: This article on Python Automation in Windows with Visual Studio Code is a prerequisite for running Python Script via Windows Task Scheduler
Tasks can be scheduled to execute in response to these events, or triggers. If you wish to have your script run at a specified period of time or a specific number of times in Windows, you will have to create a scheduled task.
Also, see “How to Fix Python was not found run without arguments to install from the Microsoft Store“, and how to “Add Dynamic Wallpaper controlled by time on Windows 10 and 11“.
What is MBAM?
Before discussing the steps to run a Windows Scheduled Task. I will like to discuss what Microsoft BitLocker Administration and Monitoring (MBAM) is. It is an administrator interface used to manage BitLocker drive encryption. It allows you to configure your enterprise with the correct BitLocker encryption policy options, as well as monitor compliance with these policies.
Kindly refer to the following similar guides on BitLocker. how to fix the missing BitLocker Recovery Tab in Active Directory Users and Computers, and how to enable or disable BitLocker Drive Encryption on Windows 10 and Virtual Machines.
How to run Python Script via Windows Task Scheduler
In Linux, you will have to create a cron job. The cron command-line utility is a task (job) scheduler on Unix-like operating systems. Using Windows Scheduler is most suitable for scheduling repetitive tasks.
Here are some related topics: How to automate Windows Update with PowerShell and Task Scheduler, Task scheduler errors, and success code |What does code 0x41301 mean?, how to create, edit and delete a scheduled task via the Command Prompt, and Windows Admin Center Error: Scheduled task status prompts error 0x800710E0.
Since I do not want to manually run this task, once a week, twice a month, every week, etc., as the case may be for you, Windows provides a tool that will run our script at a given time. These tasks can be created to execute in response to these events or triggers in the Windows Task Scheduler.
Prepare the Python Script
You would need to have a Python script ready in order to perform this operation successfully. Here is a sample script used for determining the “number of BitLocker key recovery operations with Successful status in the last two weeks When you are finished with the Python script, ensure you have it saved with the .py extension to any location of your choice “C:\Users\techdauser1\test1.py“.
For me, I have it saved to the desktop as this is just for demonstration solely for writing this guide. This code assumes you already have the CSV file imported from the MBAM Reporting Services.
Note: I will be configuring Windows Task Scheduler to run a Python script via PowerShell. Using the using a wrapper .ps1 PowerShell script is absolutely an easy approach to run Python scripts in PowerShell. Ensure sure Python is installed and in the system PATH. Also, do not forget to set the PowerShell execution policy to bypass the file in the argument ‘-ExecutionPolicy Bypass -File “C:\Path\To\Your\ScriptRunner.ps1” for example if you wish to use this approach or outrightly, permit PowerShell to run. Alternatively, you could also use the .bat wrapper, but this will not be covered in this post.
Here are some guides on how to do this “Recovery Audit Report: How to query MBAM to display the report for BitLocker Recovery for a specified period of time“, and “MBAM reports automatic E-mail notification: How to create MBAM Enterprise and Compliance, and Recovery Audit reports“.
#script created by Christian Eromosele. If you must use it on any blog, kindly ensure you reference the link to the blogpost.
import csv
import datetime
# Get the current date and time
current_date = datetime.datetime.now()
# Calculate the date two weeks ago
two_weeks_ago = current_date - datetime.timedelta(weeks=2)
# Open the CSV file
with open("C:\\Users\\TechDAPC1\\Desktop\\RecoveryAudit\Recovery Audit Report.csv", 'r') as file:
    reader = csv.reader(file)
    # Skip the header row
    next(reader)
    # Count the number of success events
    success_count = 0
    for row in reader:
        event_date = datetime.datetime.strptime(row[0], '%m/%d/%Y %H:%M:%S %p')
        if event_date >= two_weeks_ago and row[2] == "Successful":
            success_count += 1/2
# Print the number of success events
print("Number of BitLocker key recovery operations with status "Successful" in the last two weeks: ", success_count)
#used to exit or terminate a script after execution completes
exit ()
Steps to set up the Windows Task Scheduler to run Python Script
These steps are similar to running PowerShell or bask scripts. Since this article is on Python script execution, kindly let’s jump at it right away.
Launch the task scheduler: To do this, open the task scheduler application on your computer by searching for Task Scheduler in the start menu.

Alternatively, to bring up the Run dialogue box, press its Win + R key combination. Next, enter taskschd.msc within the run dialog window.

Click the OK button to open the Task Scheduler window. This will open the Task Scheduler window.

Note: There are tons of ways to open Windows Task Scheduler such as from the Windows terminal, Computer Management console, Task Manager, Control Panel, or by creating a Task Scheduler Shortcut on your desktop etc. You just have to decide on any of the methods here that are favourable to you.
Please see how to visualize MBAM Recovery Audit Report with Python, how to Run or Edit and Delete Tasks via Windows Task Scheduler, Ansible: No Python interpreters found for the host, how to detect if an application was uninstalled on Windows: Find out who has uninstalled an application via Windows Event Viewer, and how to create and set up Azure Container Instance to deploy your first Docker Image to Azure Using Azure CLI.
Create a New Task: To create a task in the task, click on create Task as shown below.

Determine the Path to your Python Installation
Note: There are different ways to run Python script in Windows such as creating a batch file to run Python script or using an executable (exe) where the path of our Python installation will be required.
To run the Python script automatically using the Windows scheduler, kindly follow these steps attentively. You will need the path to the Python installation such as
C:\Users\techdauser1\AppData\Local\Microsoft\WindowsApps\PythonSoftwareFoundation.Python.3.10_xxxxxx\python.exe”. Since I installed Python via the Microsoft store, this was handled by Microsoft for me. You may need to run the following python code below to determine the path to your python installation.
For more information on this, please see “Getting started with Python Automation in Windows with Visual Studio Code“, and how to upgrade and downgrade PIP on Windows.
import sys
print(sys.executable)
Below is the output when the code above is run.

You could also determine the python installation path via the Python interactive Shell as shown below. In this case, Python was not installed from the Microsoft store.

Run the Python Script via Task Scheduler
Now that we have the python installation path, we should then proceed with creating the scheduled task. Under the “Create Task” window, enter your desired name as shown below.
Select Run whether user is logged on or not.
Select Run with highest privileges option. Shortly, I will select the option "Do not store password".
Under Security Options, identify the domain/Windows account currently associated with the task. If it is not the correct account, click Change User or Group and select the right account.
Navigate to the next Tab “Triggers”. Click on New

This would open the New trigger window. The options here are left to you and should be configured based on your lab, Test or production requirements.

As you can see below, I have configured the Trigger and will now move to the next Tab.
By the way, a trigger means an event that causes our script to run.
On the Actions Tab, click on New as shown below.


Define the Action
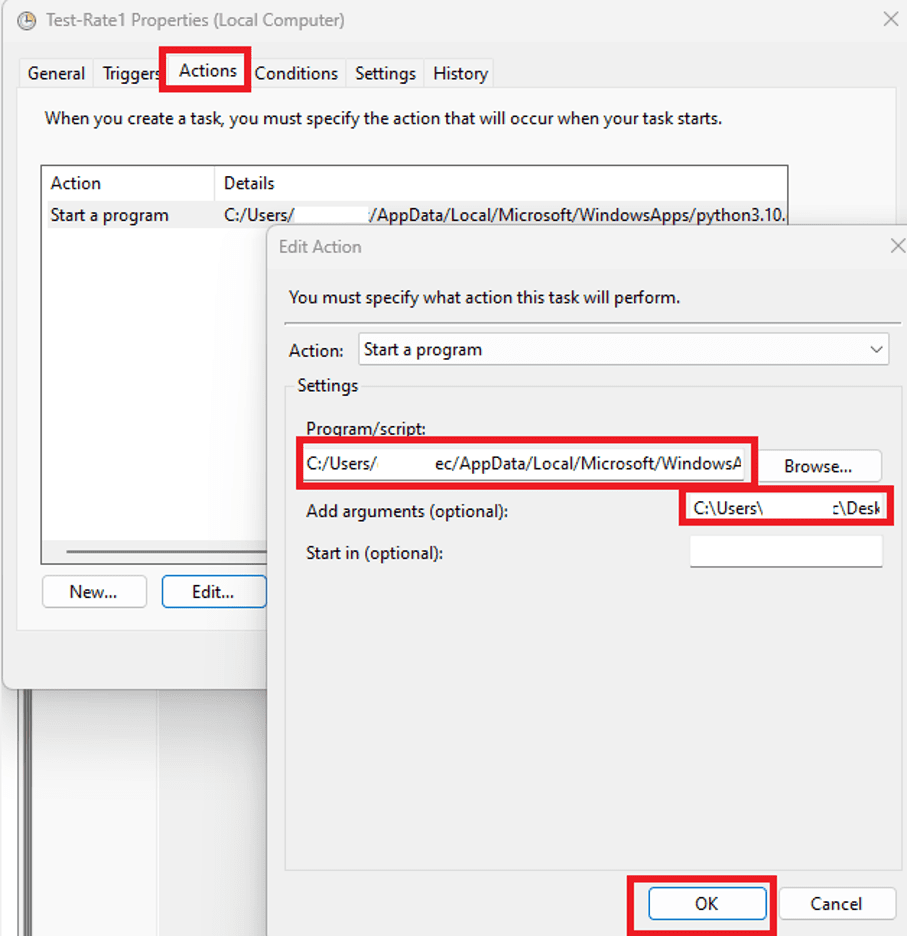
As you can see above, we do not have any arguments and programs yet. Please specify the following parameters as shown in the image below:
- Action: Start a program
- Program\script: [Exe name or paths like Python.exe or cmd.exe or PowerShell location]. In our case, it is Python.
- Add arguments (optional): [Add command line argument if any] – Path to the python script itself.
- Start in(optional): [directory path where python script exists]
If these parameters are not entered correctly, you would get the following errors “how to fix 0x2 task scheduler“, and “how to fix the directory name is invalid“.
As you can see, the Action task has been created.

Alternatively, you could specific the arguments and start in this way which is my preferred choice.

Uncheck any connection that is not applicable to you

Under the settings Tab, kindly specify the settings that you would like to affect the behaviour of your task.

Enter your Credential in the Task Scheduler Window
Upon clicking on OK, you will be prompted to enter your password. Kindly enter your password and press OK.

Note: If you remember above, I told you how to use the option “Do not store password”. Head back to the General Tab by editing your Task as shown below.
Check the button "Do not store password. The task will only have access to the local computer resources" and click on Ok..
As you can see below, we have successfully created our task in Windows. As you can see, the task is Ready and has not been run yet.

Therefore, we will manually run it by right-clicking on the Task “Test-Rule1” and selecting “run“. Or click on the task and select run on the Action pane.

View Scheduled Task Job
As you can see below, I have manually run the task to ensure it is free of errors and will be run as scheduled. If you no longer need this task, you can have it disabled.
At this point, you can close the Windows Task Scheduler. You are free to learn more about Python in Windows from this link. Also, here is an interesting link on Python on Windows from Microsoft.

You could also take a look at the Windows Event Log for the successful completion of this task. Here is how to locate it.

I hope you found this blog post helpful. Now, you have learned how to determine the number of MBAM Recoveries Performed: How to run Python Script via Windows Task Scheduler. Please let me know in the comment session if you have any questions.


