Skip to content

TechDirectArchive

Hands-on IT, Cloud, Security & DevOps Insights

  • Home
  • About
  • Advertise With US
  • Contact
  • Reviews
  • Toggle search form
Home » Windows » Use iCloud for Windows: How to install and uninstall iCloud for Windows
  • image 30
    How to Fix “Insufficient System Resources Exist to Complete the Requested Service” error Windows
  • get computer specific model information
    How to get Windows PC specific Model information Windows
  • How to Make More Space Available on the Windows 11 Taskbar
    How to Make More Space Available on the Windows 11 Taskbar Windows
  • HyperV
    Unable to PXE boot a HyperV VM: F12 key does not work anymore Virtualization
  • HiveNightmare
    Workaround for “SeriousSAM or HiveNightmare” registry vulnerability for Windows 10 and 11 Security | Vulnerability Scans and Assessment
  • Turn Focus on Enable or disable notifications for Apps on Mac
    Turn Focus On/Off: Enable or Disable Notifications for Apps on Mac Mac
  • mendeley
    Install Mendeley Reference Manager: How to integrate Mendeley Cite for Microsoft Word on Mac JIRA|Confluence|Apps
  • 785509289 780x439
    How to configure Pleasant Password MsSQL SSO Password Manager

Use iCloud for Windows: How to install and uninstall iCloud for Windows

Posted on 06/11/202325/03/2024 Christian By Christian No Comments on Use iCloud for Windows: How to install and uninstall iCloud for Windows
iCloud-for-Windows

iCloud for Windows is a Windows-based application provided by Apple that allows you to access your iCloud content, including photos, videos, documents, and emails, from a Windows PC. It provides seamless integration between your Windows computer and your Apple devices, such as iPhones, iPads, and Macs. In this article, we shall discuss how to “use iCloud for Windows: How to install and uninstall iCloud for Windows”. Please see How to sync your passwords across iOS and Mac devices, and FoneTool is the best iPhone backup software. Also, see How to upgrade macOS Big Sur to macOS Monterey.

The easiest way to load data from iCloud onto a Windows PC is to use iCloud’s web interface. To do this, navigate to iCloud.com, log in and download images. You only need iCloud for Windows if you want to synchronize data. Please see how to remove Windows PC from your iCloud Account Completely.

Features of iCloud for Windows

That said, iCloud for Windows automatically keeps your photos, files, calendars, contacts, passwords, and other important information in sync between your iPhone and your Windows PC. With iCloud for Windows, you could perform the following

  • Keep your photos up to date across all your devices and your PC.
  • Create shared albums and invite people to add their own photos, videos, and comments.
  • Access, add, or remove photos and videos in your shared iCloud Photo Library.
  • View photos directly in the Microsoft Photos app on Windows 11.
  • Securely store and open all your files and folders on iCloud Drive.
  • Share files with friends, family or colleagues directly from File Explorer.
  • View and manage your passwords in the iCloud Passwords app on your Windows PC.
  • Secure and sync your passwords across all your devices, including your PC, using the iCloud Passwords extension in Chrome or Edge.
  • Create time-based one-time passwords (TOTP) in the iCloud Passwords app.
  • Keep contacts and calendars up to date across all your devices and your PC.
  • See your iCloud calendar in Outlook.
  • Bookmarks in Edge, Firefox and Google Chrome are automatically kept up to date with the latest Safari.

Download iCloud for Windows

Navigate to the following link to download iCloud for Windows. Click on the download link as shown below.

Download-iCloud-for-Windows

Click on install as shown below.

Install-the-iCloud-App

This will require you to open iCloud from the Microsoft Store.

Open-in-Microsoft-Store

Now, iCloud as been opened from the Microsoft Store. Click on Download as shown below.

iCloud-for-Windows-i-download

Shortly, iCloud will be downloaded and installed on your PC.

iCloud-for-Windows-Downloaded-and-installed

You may also want to see “AD Connect Sync Service not running: Cannot proceed because the sync service is not running, start the ADSync service and restart the AD Connect Wizard to continue“, and how to restore accidentally deleted calendars, bookmarks, files, or contacts from iCloud.

Launch iCloud for Windows

iCloud for Windows has been installed, click open as shown below.

open-iCloud-for-Windows

Login to associate the PC with iCloud. Provide your Apple ID and password and click on sign-in

login-to-associate-PC-with-iCloud

A verification code will be sent to you. Click Allow to enable your Apple ID to sign into a new device.

Allow-connection

Do not forget to enter the verification code displayed on your Mobile Device

Enter-the-verfification-code-sent

Next, you would have to select what you would like to synchronize with iCloud. When you are done, click on Apply.

Select-what-you-want-to-link-to-your-Windows-PC

You may want to see PowerShell Script: Uninstalling Applications Made Easy, and how to fix Norton Autofix identified an issue: Fix Norton 360 Installation has encountered an error 8404 on Windows.

Uninstall iCloud for Windows App

If you need to uninstall iCloud for Windows for any reason, you can easily do so using the Windows Settings. It is advisable to back up the local data to iCloud first. While it’s pretty easy to uninstall iCloud with Windows Setting. Sometimes, it does leave behind some residual files. Apple has documentation on these regarding the version of Windows you are using.

You can do a thorough uninstall using the uninstaller program "Revo Uninstaller".

Before signing out of or uninstalling iCloud for Windows, you may want to make a copy of your iCloud data and save it on your PC as mentioned earlier. This is because the information on your PC won’t automatically stay up to date in iCloud and you won’t see updates made on your other devices.

Step 1: Sign out of iCloud on Windows using the signout button below. When prompted to enter the Apple ID and password, ignore this as you wish to remove iCloud for Windows.

Select-what-you-want-to-link-to-your-Windows-PC

Step 2: Choose Start menu > Settings

Windows-Start-Menu

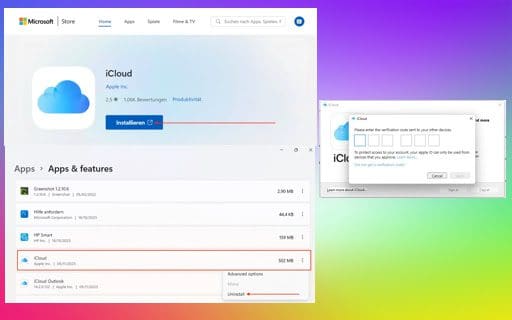
Click on Apps and then on Apps & features.

Windows-Apps

Locate iCloud, click the More button, choose Uninstall, and then follow the onscreen instructions.

Uninstall-iCloud-for-Windows

Confirm iCloud removal

Confirm-iCloud-removal

Since I am using Windows 11. This is all that is needed to install and uninstall iCloud for Windows as stated in their documentation.

FAQ relating to the usage of iCloud for Windows

Is iCloud for Windows compatible with all Windows versions?

iCloud for Windows is compatible with Windows 7 and later versions, including Windows 10. However, for the best experience and access to all iCloud features, it’s recommended to use it with the latest versions of Windows. Some advanced features may not be available on older Windows versions.

Can I access my iCloud Photos on a Windows PC?

You can access your iCloud Photos on a Windows PC using iCloud for Windows. When you enable the Photos option during the setup, it will automatically download and sync your photos and videos to your PC. You can then access and manage your iCloud Photos using the Windows File Explorer or the iCloud Photos app.

I hope you found this blog post helpful on how to use iCloud for Windows: How to install and uninstall iCloud for Windows. Please let me know in the comment section if you have any questions.

Rate this post

Thank you for reading this post. Kindly share it with others.

  • Click to share on X (Opens in new window) X
  • Click to share on Reddit (Opens in new window) Reddit
  • Click to share on LinkedIn (Opens in new window) LinkedIn
  • Click to share on Facebook (Opens in new window) Facebook
  • Click to share on Pinterest (Opens in new window) Pinterest
  • Click to share on Tumblr (Opens in new window) Tumblr
  • Click to share on Telegram (Opens in new window) Telegram
  • Click to share on WhatsApp (Opens in new window) WhatsApp
  • Click to share on Pocket (Opens in new window) Pocket
  • Click to share on Mastodon (Opens in new window) Mastodon
  • Click to share on Bluesky (Opens in new window) Bluesky
  • Click to share on Threads (Opens in new window) Threads
  • Click to share on Nextdoor (Opens in new window) Nextdoor
Mac, Windows Tags:Microsoft Windows, Windows 10, Windows 11, Windows Server 2016

Post navigation

Previous Post: Norton Autofix identified an issue: Fix Norton 360 Installation has encountered an error 8404 on Windows
Next Post: How to access shared resources from two different domains

Related Posts

  • xxxxxx
    How to move the Taskbar to a second screen in Windows Windows
  • Using the Command Prompt to add and modify the Windows registry
    How to add and modify the Windows Registry from the Command Prompt Windows
  • Feature image 1
    Configure and validate Exclusions for Microsoft Defender Antivirus scans Anti-Virus Solution
  • TamperProtection
    Protect Microsoft Defender Settings with Tamper Protection Security | Vulnerability Scans and Assessment
  • schedulepythontasksinWindows
    Run Python Script via Windows Task Scheduler Windows
  • img 5c0128ea77f3f
    Systeminfo switches: How to use Systeminfo command-line tool switches Windows

More Related Articles

xxxxxx How to move the Taskbar to a second screen in Windows Windows
Using the Command Prompt to add and modify the Windows registry How to add and modify the Windows Registry from the Command Prompt Windows
Feature image 1 Configure and validate Exclusions for Microsoft Defender Antivirus scans Anti-Virus Solution
TamperProtection Protect Microsoft Defender Settings with Tamper Protection Security | Vulnerability Scans and Assessment
schedulepythontasksinWindows Run Python Script via Windows Task Scheduler Windows
img 5c0128ea77f3f Systeminfo switches: How to use Systeminfo command-line tool switches Windows

Leave a Reply Cancel reply

You must be logged in to post a comment.

Microsoft MVP

VEEAMLEGEND

vexpert-badge-stars-5

Virtual Background

GoogleNews

Categories

veeaam100

sysadmin top30a

  • image 30
    How to Fix “Insufficient System Resources Exist to Complete the Requested Service” error Windows
  • get computer specific model information
    How to get Windows PC specific Model information Windows
  • How to Make More Space Available on the Windows 11 Taskbar
    How to Make More Space Available on the Windows 11 Taskbar Windows
  • HyperV
    Unable to PXE boot a HyperV VM: F12 key does not work anymore Virtualization
  • HiveNightmare
    Workaround for “SeriousSAM or HiveNightmare” registry vulnerability for Windows 10 and 11 Security | Vulnerability Scans and Assessment
  • Turn Focus on Enable or disable notifications for Apps on Mac
    Turn Focus On/Off: Enable or Disable Notifications for Apps on Mac Mac
  • mendeley
    Install Mendeley Reference Manager: How to integrate Mendeley Cite for Microsoft Word on Mac JIRA|Confluence|Apps
  • 785509289 780x439
    How to configure Pleasant Password MsSQL SSO Password Manager

Subscribe to Blog via Email

Enter your email address to subscribe to this blog and receive notifications of new posts by email.

Join 1,839 other subscribers
  • RSS - Posts
  • RSS - Comments
  • About
  • Authors
  • Write for us
  • Advertise with us
  • General Terms and Conditions
  • Privacy policy
  • Feedly
  • Telegram
  • Youtube
  • Facebook
  • Instagram
  • LinkedIn
  • Tumblr
  • Pinterest
  • Twitter
  • mastodon

Tags

AWS Azure Bitlocker Microsoft Windows PowerShell WDS Windows 10 Windows 11 Windows Deployment Services Windows Server 2016

Copyright © 2025 TechDirectArchive


Loading Comments...
 

You must be logged in to post a comment.