
n this article, you will learn how to reinstall Server Manager and disable Server Manager at startup for all users and login users. Server Manager is a management console in Windows Server that helps IT professionals provision and manage both local and remote Windows-based servers from their desktops. Please see How to reset and reinstall Windows 10 from the cloud and how to recover your Windows 10 when you cannot boot to Windows, and how to reset and reinstall Windows 10 locally.
Server Manager is installed by default with all editions of Windows Server and can be used to manage server core options.
You may also want to see how to enable and disable automatic login on Ubuntu Linux via the GUI and CLI, and how to launch an application automatically during startup on Windows.
What is “Server Manager”?
The Server Manager was first introduced with Windows Server 2008 and it gave administrators the ability to install, configure and manage server roles and features and since then, it has become the central control point for the administration of Windows Server.
You might have intentionally or unintentionally uninstalled .NET Framework from your server, thus resulting in a broken Server Manager. This might also result in PowerShell not launching correctly on your device.
This error is also common when you performed an in-place upgrade of Server 2019 (Desktop Experience). The following executables will be missing “ServerManager.exe & ServerManagerLauncher.exe”. See the following guide on how to enable Bitlocker via the Local Group Policy Editor and the Group Policy Management Console.
To reinstall .NET Framework, please follow the steps in this guide. “How to enable or disable DotNet Framework (NetFx3) via PowerShell, Control Panel, and DISM in Windows“. In this case, I will recommend using the CLI described in step 1.
Part 1 – Reinstall Server Manager
You will have to launch PowerShell as an Administrator as shown below.

Then run the following DISM command below to have Server Manager re-installed on your system.
dism /online /enable-feature /all /featurename:server-gui-mgmt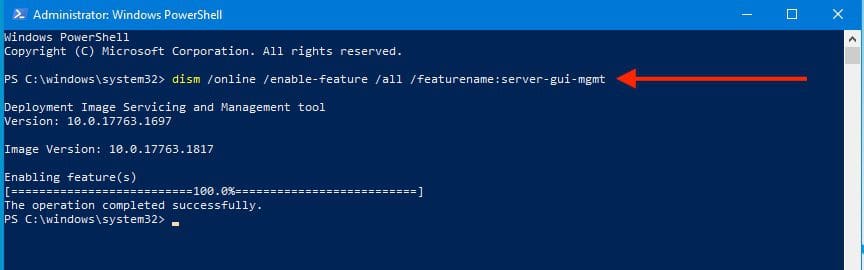
As you can see below, the server manager is now re-installed and can be used to install, configure and manage server roles and features.

For more information on DISM, please see the following posts: Remove Windows 10 Apps with DISM:How to remove pre-provisioned apps from Windows Image, how to resolve DISM unspecified error when removing preinstalled packages, and how to add languages to Windows image using DISM and PowerShell.
Part 2 – Disable Automatic Startup for Server Manager
Launch the Server Manager and Click on Manage. And select “Server Manager Properties”

Check the Don’t start Server Manager automatically at logon and click on OK.#

You may want to see some related guides: Windows Admin Center:How to set up WAC, how to Test Network Connection to the Windows Admin Center (WAC) Gateway, setup System Insights on Windows Admin Center (WAC), and how to upgrade Windows Admin Center.
Part 3 – Disable Server Manager at startup for all users
To do this, launch the Group Policy Management as shown below

You may create a new policy. Since I have an existing Domain Policy, I will modify this by editing it as shown below.

Expand the Computer Configuration\Administrative Templates\System\Server Manager. On the right side of the window, select “Don’t display Server Manager automatically at Logon“.

Please, see how to fix Logon Failure: User has not been granted the requested logon type, and the Server Certificate could not be updated: Private key does not match.
Enable the Policy
Then select Enable and click on OK.

As you can see, the policy has been enabled.

Note: If you created a new policy, you will have to link the Group Policy in the right OU with the Servers that you want to Apply or use the Security Filtering to Filter the Servers that you want to apply. See the hyperlink for the difference between GPUpdate and GPUpdate /force, and for some group policy implementations.
You may want to see the following articles as well. Why use RSAT? How to Install RSAT on Windows 10, Remote Server Administration Tools: To install RSAT on Windows Server, and what is Group Policy Object and how can it be launched in Windows.
I hope you found this blog post helpful on how to reinstall Server Manager and disable Server Manager at startup for all users and login users. If you have any questions, please let me know in the comment session.


Thank you! It was useful.
I am glad you found this useful. Thank you for your kind words…
life saver
I am glad you found this useful